Saturday 30 May 2015

Malteaser Slice

 
This is one of those viral Internet recipes.  Lucy from Bake Play Smile has other great no bake slices on the blog, head on over and check out her recipes.
 
Ok so my picture is like one of those "Nailed it" pictures.  I know its not the best, what I have learnt is that I cannot cut hard white chocolate, even with a very sharp and or hot knife!  So I found another way to do it but don't have photos yet.  I'll explain later, so keep reading.
 
I made this slice as one last Thank you to the staff in the Radiotherapy Dept. at the Mater in Newcastle.  Scott has finished treatment and after seeing the staff 5 days a week for 7 weeks and seeing the fantastic work I wanted to take them one last treat.
 
This would be great to make for a party, kids or adults party or for a bake sale at school.
 
1 can condensed milk
1 x 250g packet of Nice biscuits (or any sweet dry biscuits)
2 cups rice bubbles
200g pack Malteasers
125gm butter
2 tablespoons cocoa powder
200g white chocolate
2 tablespoons Copha or coconut oil


In a saucepan heat over a low heat the butter, condensed milk and cocoa powder.  Keep an eye on it or it will burn.  You may need to whisk it together to get it all combined.

 
Blitz your biscuits in the food processor to a fine crumb.

 
Cut a cup of malteasers in half or as close to half as you can get.
 
 
In a mixing bowl add the biscuit crumbs, rice bubbles and malteasers.

 
Melted goodness.

 
Mix the wet and dry ingredients together until all combined.

 
Press this into your lined slice pan.

 
Melt your white chocolate and copha in the microwave in 30 second bursts until melted.

 
Pour the white chocolate over the top and spread.  Place the rest of the malteasers into the white chocolate, pressing down gently.  At this stage the recipe said to stick it in the fridge over night then slice. 
 
Well the horror story below is a warning picture not to do this!
 
 
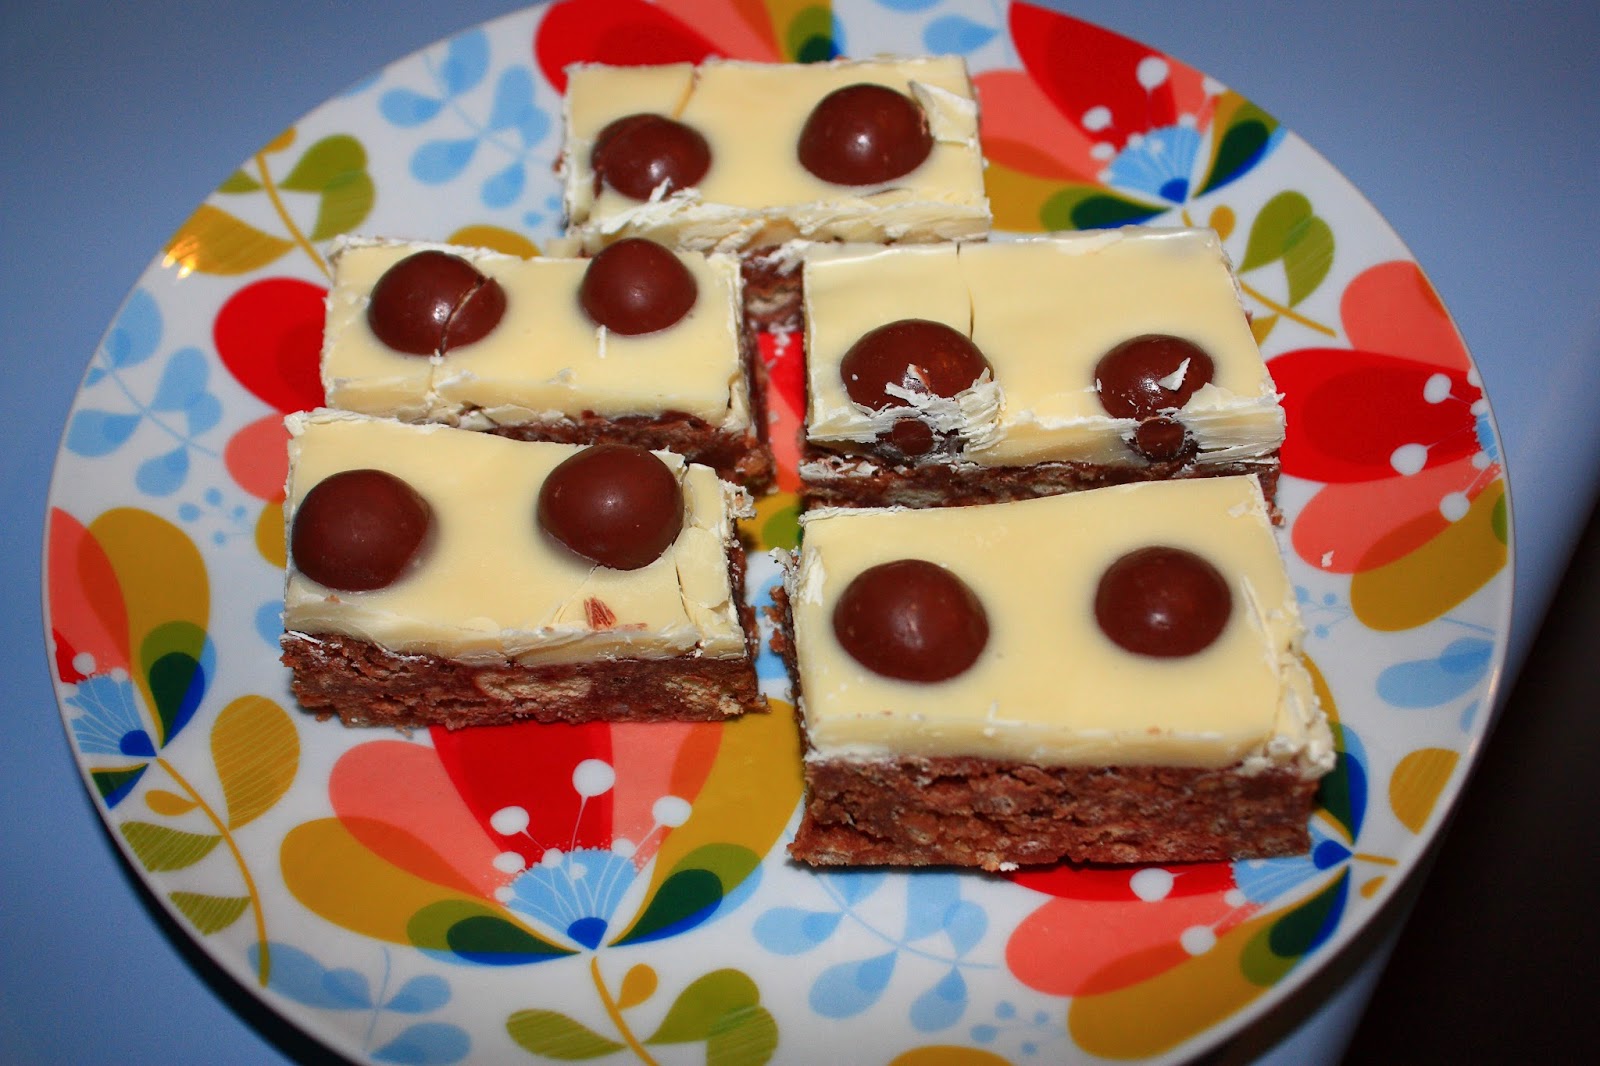
What you need to do to get perfect slices is stick it in the fridge for 5 minutes or until the white chocolate is jusssssssssst set, no longer runny.  Take it out of the fridge and with a paring knife run it through the white chocolate, almost like scoring the chocolate, don't cut all the way through the slice you just want to cut the white chocolate so that when you cut it the next day you don't crack it and have a nice slicing guide.

Friday 29 May 2015

Applesauce Cinnamon Bundt Cake

 
I bought this fancy new cake tin.  I have been drooling over this tin for weeks and I went back and forwards over buying it.  It is a Nordic Ware cake tin, they are a little more expensive but well worth it.  To buy them in Australia Williams Sonoma Australia the Bundt pan is the same price here in Australia as you would pay in America funnily enough.
 
So while waiting impatiently for my Bundt pan to arrive I was doing some "research" and trolling the Internet for Bundt recipes.  This is a take on a Martha Stewart recipe but I did change it up to suit myself.
 
If you live in a dairy free household, this is a great recipe for you,  just swap the butter for margarine and your away.
 
You can either buy applesauce from the supermarket or make your own.  It is apple season here in Australia so good time to make it,  if you are having a roast pork this weekend make a double batch and you can have some for your dinner as well.  Roasted applesauce recipe is below.


2 1/2 cups Plain flour
2 teaspoons bi carb soda
1 1/2 teaspoons ground cinnamon
1 teaspoon salt
200 gm butter or margarine, room temperature
2 cups light brown sugar
1/4 cup honey
2 eggs
2 cups Applesauce
 
 
Cream together butter, brown sugar and honey until light and fluffy, remember to scrape down the sides to ensure everything is mixed through.

 
Beat in your eggs one at a time, turning the mixer on high for 30 seconds between each addition to ensure mixed through.

 
In a separate bowl add your flour, bi carb soda, cinnamon and mix together with a whisk.

 
Add your applesauce.

 
In thirds gently add your flour mixture and mix until just combined.

 
Drop your mix into a prepared pan and bake in a pre heated 175C oven for 50 minutes or until a toothpick comes out clean.

 
Allow to cool in the pan for 10 minutes then turn onto a cooling rack.


Serve as is or warm with a small scoop of ice cream or dollop of whipped cream.

Tip: if you turn your cake onto a tea towel on your cooling rack you will not get any rack marks on the base of your cake.
 

Saturday 23 May 2015

Martha Stewart's One Pot Pasta

 
I have seen the video for this on the Martha Stewart website a number of times over the last couple of months, I have been meaning to make it sooner and this week I did make sure I had the ingredients (well almost all of them) in the house. 
 
It is just Jonathan and I at the moment for some meals, and just me for others so finding things to cook that A. don't upset Scott's stomach and B. are easy to make and eat over the sink or under the exhaust fan is a little tiring. 
 
I must say this recipe was a triumph!  Both Jonathan and I loved it.  Now I did halve the recipe as it was just for 2 and I did substitute Parsley for the Basil, I also used 1 cup of wine as a sub for 1 cup of water and I used a bit less of the Chili flakes, however the recipe is very forgiving and easy to adjust to your likes and dislikes.
 
I will give you the recipe for 4 serves and if you wish to adjust it please do so.
 
350gm spaghetti, penne, linguine or pasta of your choice, it must be dried pasta not fresh
350gm cherry or grape tomatoes, halved
1 medium onion, finely sliced
1 clove garlic, finely sliced
1/2 teaspoon chili flakes (optional)
2 sprigs fresh basil (I used a tablespoon chopped parsley)
2 tablespoons olive oil
1/2 teaspoon salt
1/4 teaspoon ground pepper
4 1/2 cups water (you could substitute one cup of water for a cup of white wine)
Grated Parmesan to serve


Chop your tomatoes in half.

 
Finely slice your onion and garlic.

 
In your pot or high sided pan, place your pasta, tomatoes, onions, garlic, basil, oil, salt, pepper, and chili flakes.

 
Add your water (and wine if desired).  Cook on medium flame, just remember not to walk away from this dish as it only takes approx. 9 minutes to cook and you don't want all the liquid to boil away.

 
Stir a couple of times through the cooking to ensure the pasta doesn't clump or stick.

 
When your pasta is cooked and you have a nice little sauce bubbling in the bottom of your pan, it's time to serve.

 
Grate some fresh Parmesan over the top and enjoy.

Sunday 17 May 2015

Blackberry Buckle

 
Sunday afternoon and the house is quiet, everyone else in the house are asleep, Smudge has found a sunny spot on my jumper, Lala is asleep in the sun on the carpet and Scott is asleep on the couch.  There are black clouds in the sky however some sunny breaks as well.
 
It is Mid Autumn here in Australia and quite a cool Sunday.  All cool Sunday's deserve a yummy hot dessert after dinner.  Whether it is a Sunday Roast or a big bowl of soup and some toasted cheese and tomato sandwiches.
 
Now berries are scarce or at least very expensive at this time of year, so I use frozen berries, very convenient and well cheaper than fresh that's for sure.


 Found the sunny spot.


500g blackberries (fresh or frozen)
125gm butter, melted
1 cup plain flour
1 cup castor sugar plus 2 tablespoons extra
1 cup milk
2 teaspoons baking powder
 

Pre heat oven to 175C or 165C fan forced.

 
If using frozen berries allow to defrost for 2 hours.  Mash gently with potato masher to release some of the juice.  They don't need to be a pulp and whole berries are nice.

 
In a mixing bowl place your flour, sugar, and baking powder.

 
With your whisk mix the dry ingredients together, this also sifts them.

 
Mix through the milk, make sure no flour lumps are left.

 
Mix the melted butter thoroughly.
 
 
Pour into a buttered baking dish or pie tin.
 
 
Spoon the berries into the centre of the batter in a single layer.
 
 
Bake for an hour.  Allow to sit once removed from the oven for at least 5 minutes, the fruit with be boiling at this stage.
 
 
Serve with ice cream, cream, or crème fraiche.

Saturday 16 May 2015

Lemon Sour Cream Crumb Cake


Ok I think I may have broken the Internet.  Or at least I made it cry. 

I have been running a search with every conceivable combination or wording for a cake like this one.  Nothing similar.  Good news on one front, original recipe YAY! Bad news on another front, I had to make one up, and well recipe testing on a spanking new recipe can be long and arduous.  There is more often than not, no instant gratification and you have to tweak things over many bakes.

Well lucky me!  This recipe went off without a hitch :D YAY!  I got rave reviews from the ladies at the Mater and I must say, I had cake for breakfast after taking the beauty shot :)

For the Crumb topping.

1/4 cup castor sugar
1/3 cup light brown sugar, lightly packed
1/4 teaspoon grated lemon zest
1 1/3 cups plain flour
100gm butter, melted

For the Cake.

75gm butter, room temp
3/4 cup castor sugar
2 large eggs
grated zest of 2 lemons
2/3 cup sour cream
1 1/4 cups plain flour
1 teaspoon baking powder
1/4 teaspoon baking soda
1/4 teaspoon salt

Pre heat your oven to 180C.  Butter and line with baking paper one 20cm round cake tin.

 
Zest your 2 lemons.

 
For the crumb combine your sugars, flour and zest in a bowl and mix through your melted butter with a spatula until combined, and set aside.

 
In your stand mixer, beat butter and sugar until light and fluffy.  Reduce the speed and add your eggs one at a time, beating well between each egg. 

 
Add the lemon zest and sour cream.  Beat until smooth.  Sift together your dry ingredients and add to the batter while on low speed.  Mix until just combined.

 
Spoon your batter into your prepared tin (I used a lamington tin as I was feeding a crowd), spread out and level with your spatula.

 
Pour the crumb you made earlier on top and spread out evenly with your fingers.  Press gently down to make sure it won't just fall off when you cut it.

 
Bake for 40 to 50 minutes or until a skewer comes out clean.  Remove from the oven and allow to cool in the pan for 5 minutes then place on cooling rack to cool fully.  At this stage you can make an icing with lemon juice and icing sugar and drizzle in a nice pattern over the top of the crumb but it just as nice without it.


Saturday 9 May 2015

Waffles. Classic and Belgian


Good Morning Sunshine.

Happy Mother's Day to all the Mum's around the world.  I hope your Mother's Day is fantastic.  May someone make you a wonderful breakfast or brunch or a meal of any type.

As many of you will know, I received a waffle maker for my birthday.  I have been trying many different waffle batter recipes over the last couple of weeks, in an attempt to find one that will become a family favourite and regular in the kitchen (once Scott is back in Crash Test Dummy mode).

So I have after much testing narrowed it down to three batters.  Chocolate (posted a couple of weeks ago), a Classic waffle batter and a Belgian waffle batter with pearl sugar.

My personal favourite is the Classic waffle batter, Jonathan likes them all and well the jury is out for Scott as yet we will poll him in the future.

Nb.  Pearl sugar is found in speciality stores or online.  It can also be called nib sugar.  When cooked it caramelises and can leave a burnt caramel on your waffle maker you will need to clean it while the waffle maker is warm.

 
Lala wants to know where her breakfast is.


Classic Waffle Batter.

Makes 8 waffles
 
3 eggs
1 3/4 cups milk
125g butter melted
1 teaspoon vanilla extract
2 cups self raising flour
1/4 cup castor sugar
 
 
No sifting required.  In your mixing bowl place the self raising flour and sugar.

 
In a heatproof jug or bowl melt your butter.

 
Mix in the milk to the melted butter, this will cool it.  Beat through the egg, the butter will slightly solidify but that is ok.

 
Whisk together the flour mixture and the milk mixture.

 
Beat until smooth and make sure that your waffle maker is heating.

 
Add the amount of mixture as per the manufacturers directions.  Cook for specified time.


Serve and enjoy.


I served this with warmed maple syrup, a sprinkle of cinnamon sugar and a smear of butter.

 
If you have to many waffles still cook them but then sit them on a tray and allow to cool.  Stick them in a Ziploc bag and freeze for an afternoon snack for the kids or dessert in a hurry.


Belgian Waffle Batter.

Makes 8 waffles.
 
Nb. This recipe is an over night recipe.  Start the night before and allow to prove.
 
4 cups plain flour
1 package or 2 1/4 teaspoons of active dry yeast
1 1/2 teaspoon salt
3/4 cup milk
100g butter
1/4 cup honey
2 eggs
1 tablespoon vanilla
1/2 cup pearl sugar


In the bowl of your stand mixer place half of the flour, all of the salt and yeast.  Place the yeast on one side and the salt on the opposite side as the salt will stop the yeast working if you put them together.

 
Heat your milk.  To bring it back to the correct temp if too hot add the butter and allow it to melt in off the heat.  Add the honey.

 
With your dough hook on your mixer add the milk mix to the bowl and turn on low to bring the ingredients together.  Add the eggs one at a time until combined.  While the mixer runs at a medium speed add the remaining flour a cup at a time until you have a sticky dough.  You may not need all the flour.  Cover your bowl with plastic wrap and set aside on your counter over night.

 
This is Pearl Sugar.  Little nuggets of sugar :)  The next morning you can either do this bit by hand or in your mixer.  "Punch" down the dough (knock out the air) and kneed in the pearl sugar. 

 
Divide into 8 portions and set on a tray, cover with plastic wrap and allow to rest for 15 minutes.

 
Place the dough balls into the waffle maker and cook as per manufacturers directions.  I did need to flatten the dough out a bit with my hand.

 
These may look burnt but this is the pearl sugar melting and going like caramel.

 
Served with a smear of butter and warmed maple syrup.